Telinga Modular Parabolic Microphone Review
Learn why Telinga is the world’s best manufacturer of parabolic microphones in this in-depth review.

The Telinga Modular is a precise, scientific instrument capable of zooming-in on and isolating specific sounds from within a soundscape.
Parabolic microphones are used to capture, isolate and amplify sounds at a distance.
For these reasons, they’re the best tool for recording the sounds of individual bird and wildlife species while maintaining a safe and respectful distance.
In this review, we’ll have an in-depth look at the latest parabolic microphone from Telinga, the Modular.
About Telinga Microphones

Telinga has been one of the world’s leading manufacturers of parabolic microphones for over 40 years.
Founded by Klas Strandberg in Uppsala, Sweden 1981, Telinga is still owned and operated by Klas and his family.
Since founding, Telinga has had a couple of “world-firsts” in the parabolic microphone category including the first available foldable parabolic dish in 1983, as well as the first stereo parabolic microphone a few years later.
Since then, Telinga has been steadily improving its parabolic microphone design to their latest iteration: the Telinga Modular, released in 2021.
Telinga’s mission is to provide great sounding, very light weight products for outdoor use that will last for years, even in demanding weather conditions.
The Telinga Modular
The Modular is the latest and greatest parabolic microphone from Telinga.
It’s called the “Modular” due to its ability to be customized to your specifications.
The following features can be customized:
choose your own microphone(s)
mono or stereo
cable management
different wind protection levels
For this review, I’ve used x2 EM272 capsules with the stereo foam insert.
There are also a number of useful, optional accessories available for the Modular including a tripod adapter, windcoat and storage bag.
Build Quality
Part of Telinga’s mission is to provide products that will stand the test of time, even when subjected to the elements. The Modular is no exception to this intention and its design speaks for itself.
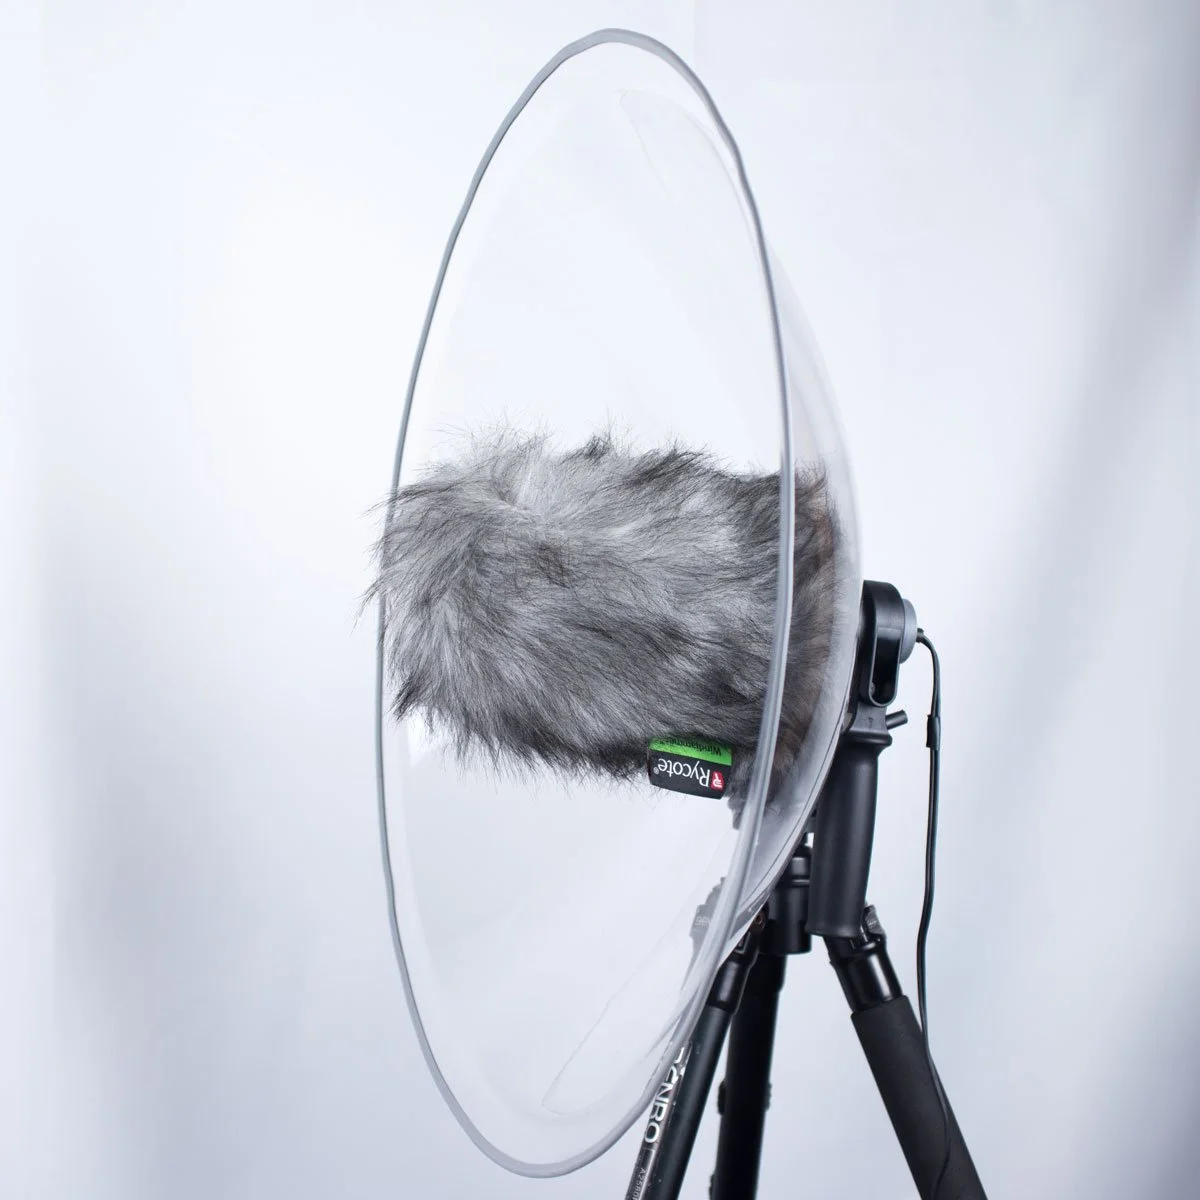
The Dish
The dish is lightweight, flexible and bounces back to a perfect parabolic shape after being rolled up during storage or travel. I’ve kept mine folded for two days on the trail and the dish returns to its parabolic shape after a couple hours.
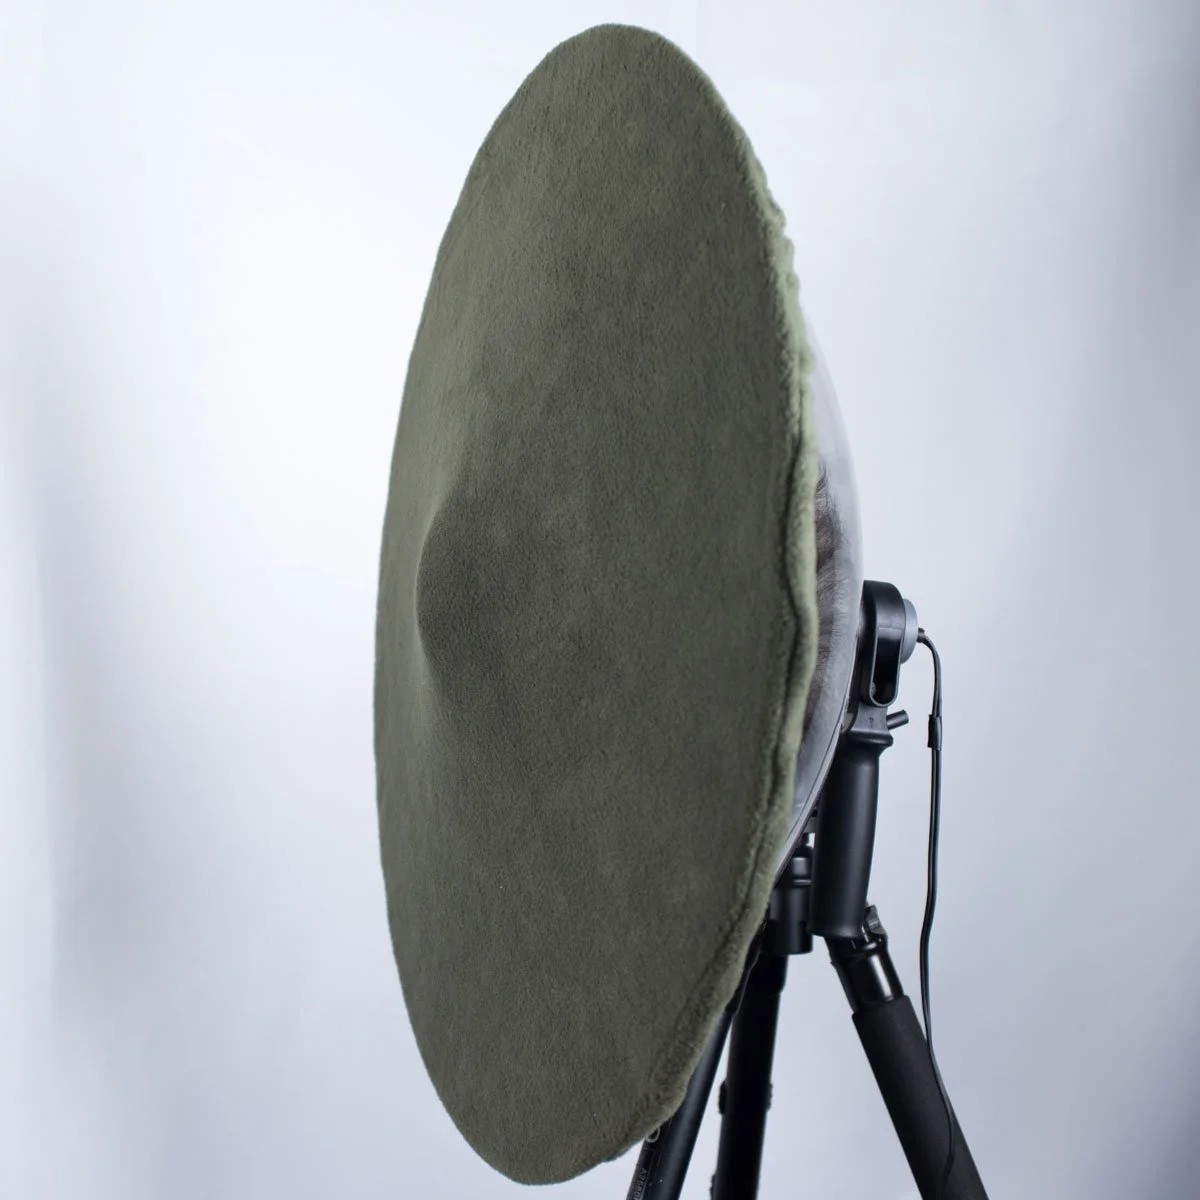
The dish also features a rubberized ring around the perimeter that eliminates any sharp edges and makes attaching the optional windcoat easy.
The Basket
Manufactured by the leading wind protection producer in the world, the Rycote blimp-style basket is a new feature for Telinga’s products and is a phenomenal addition to the Modular.
The basket serves to hold the microphones in place, reduce handling noise and is the first layer of wind protection. Custom made for Telinga by Rycote, the basket is the same design as Rycote’s Super-Blimp system.
The basket includes x2 foam inserts. One for mono and another for stereo configurations.
The Backplate
The backplate is the ring and cable management tube that connects the entire Modular together.
The plastic threads screw into the back of the basket and secure it to the dish.
The tolerances are tight and there is no “slop” in the fitting.
The entire backplate is made of very dense, high-quality plastic.
The Handle
The handle is similar to the Pro-9 MK2 from Telinga, but does not include the foam grip or cable.
All of the threads and screws are made of metal and the adjustment knobs are made of dense plastic that feels high-quality.
The hollow, circular space for accepting the backplate tube is lined with a rubber material that holds the dish extremely securely and helps to reduce handling noise.
Assembly
The first assembly step is to install your microphones of choice.
As previously mentioned, I use a stereo pair of EM272 capsules with the stereo foam insert. Here’s a tutorial on how to wire your own stereo pair of EM272s.
Start by choosing the appropriate foam insert; mono or stereo. The stereo foam insert has a hard plastic sheet embedded in the foam.
Next, open the slits in the foam and insert your microphone(s) facing the back of the dish. It’s important to have the microphone capsule at the focal point. The focal point is marked on the outside of the basket with a silver line.
To make sure my EM272 capsules don’t move around inside the foam, I secured them with small beads of hot glue.
Lastly, route your microphone wire down and out of the back of the foam insert and gently push the foam into the basket.
With the microphone(s) installed, putting together the rest of the Modular (dish, basket, backplate and handle), is a straightforward process.
Unfold the parabolic dish.
Insert the backpack threads through the rear-facing hole in the center of the parabolic dish.
Pass the microphone wires from the back of the basket through the hole in the parabolic dish and backplate tube, and screw the backplate and basket together.
Insert the backplate tube into the receiver on the handle and tighten the fitting with the adjustment knob.
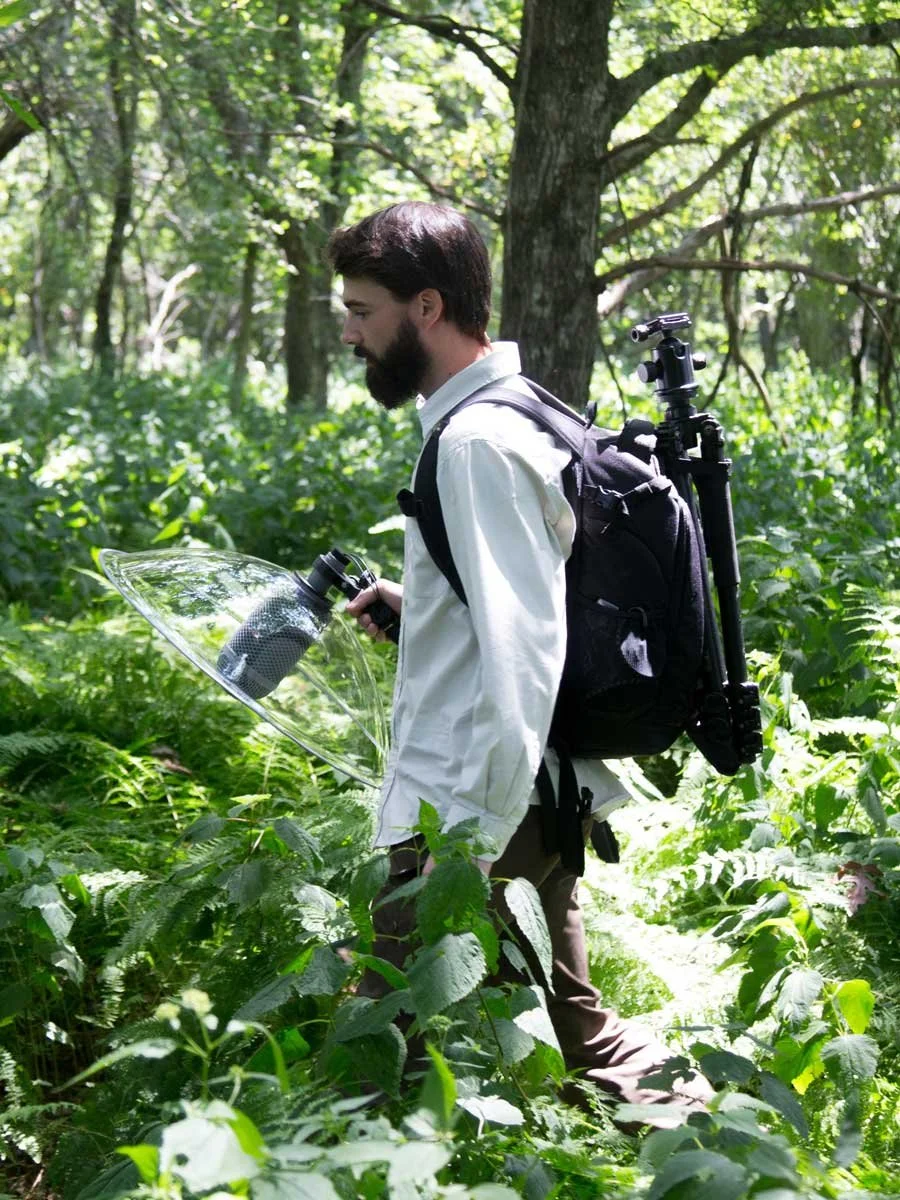
The ability to break down the Modular and set it up quickly make it efficient for traveling and field use.
Wind Protection


The Modular includes two layers of wind protection and a third as an optional accessory.
Included wind protection consists of a Rycote Super-Blimp basket and a Rycote furry windjammer.
The optional wind protection is a windcoat. The windcoat is a piece of fabric that fits over and across the entire parabolic dish and secures with a synching rope. Besides offering additional wind protection, it also prevents buzzing insects from entering the dish.
Because birds and other wildlife generally remain quiet during high winds, it’s unlikely that you’ll need all of these wind protection options, but they’re nice to have.
When I’m out in the field, I use the basket and windcoat at all times and have never had an issue with wind noise.
Wind Noise Test
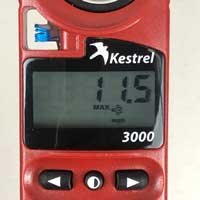
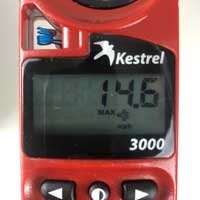
To test the Telinga Modular’s ability to resist wind noise, I set up the above test bench.
The fan has four different speed settings and is pointed directly into the parabolic dish.
To measure the wind speeds, I used a Kestrel Wind Meter.
Below you’ll find images of the wind speed measurements, sound samples and spectrograms for each recording.
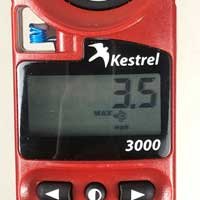

3.5mph spectrogram.
6.9mph spectrogram.
11.5mph spectrogram.
14.6mph spectrogram.
Even with just the Super-Blimp and no furry windjammer or windcoat, the Modular performed extremely well in this test.
Handling Noise
In most circumstances, handling noise is not an issue with the Modular.
I say “most circumstances” because the Modular does pick up the micro-creaks of your finger joints, but in most recording scenarios, the signal of what you’re actually recording is so much louder than the handling noise, rarely is it audible in the final recording.
However, if recording in extremely quiet environments, you may hear some handling noise.
For this reason, I recommend purchasing the optional tripod adapter accessory.
Using the Modular on a tripod is the method I recommend anyway because your aim will be much more consistent and accurate.
Accessories

Optional accessories for the Modular include:
Tripod Adapter
Rycote High Wind Cover (HWC)
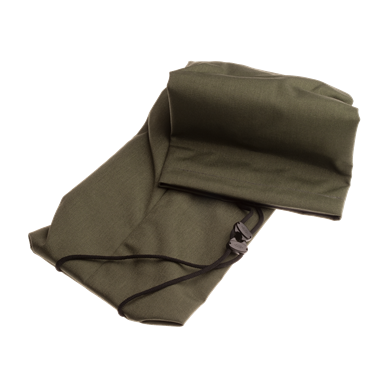
Soft Carrying Case
Out of the three, I strongly recommend the tripod adapter. It allows you to mount the Modular on a tripod or mic stand with 1/4” or 3/8” threads. This will completely eliminate handling noise and improve your aim for precise focusing on a specific sound.
The Rycote HWC isn’t really necessary for wind protection since the Rycote Super-Blimp basket is already sufficient for high winds, but it does a great job at keeping insects from entering the parabolic dish. When you’re out in the field, mosquitos, gnats and flies will be attracted to you and if they enter the dish, they’ll ruin your recording.
The soft carrying case is a nice addition for traveling with the parabolic dish folded and keeping it from getting scratched.
Performance & Sound Samples
The Modular is an absolute joy to use. Its focus is extremely precise and taking the time to properly aim the device is important to get the best sound quality.
The technique I use for aiming consists of panning left-right while monitoring the audio to find where the signal is the loudest. Then, keeping this horizontal position, I repeat the process but pan up and down to fine-tune the focus.
This technique works well handheld or on a tripod.
The dish does a great job at rejecting sounds from the rear so try positioning noise pollution sources behind the dish to minimize their effect on your recording.
The Modular’s lightweight, compactable, durable design and professional sound quality make it more than suitable for field use.
Listen to the sound samples below to hear how it sounds.
Where To Buy
The Telinga Modular is available for purchase in several countries around the world. If your country is not listed below, please see the Telinga Buyer’s Guide.
Final Thoughts
The Telinga Modular provides a unique way of listening to a landscape. Its precise focus, rejection and long-distance range provides an experience similar to a scientist looking through a microscope; isolating and observing the tiny parts that make up the greater whole.
It’s lightweight, ruggedly built, compacts down into a small form factor and can be customized to your specifications, making it a great addition to any field recording kit.
Support Acoustic Nature
If you enjoyed this post and would like to help support Acoustic Nature, please consider "buying me a coffee" or becoming a Patreon with the buttons below.
As a thank you for your support, Patreon supporters receive a copy of Field Recording For Beginners, exclusive access to the full Behind The Sounds video series, nature sound library downloads, and more.
If you are unable to support the site financially, please share this post with others, or leave a comment below letting me know you enjoyed this post! Both are free and help the website grow. Thank you ♫
Thanks for reading,
-Jared